
Water Propagation Station: How to Multiply Your Pothos for Free
Stop buying new houseplants. Learn how to harvest Pothos cuttings, find the nodes, and multiply your collection for free using water propagation.
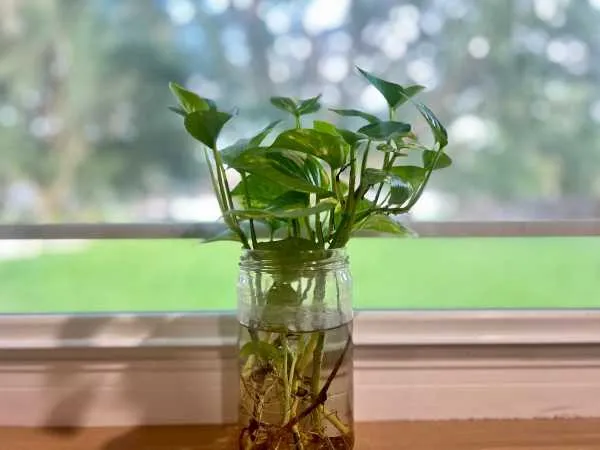
One of the most miraculous things about God’s creation is how it constantly wants to multiply and share life. You don’t need to spend a fortune at a commercial nursery to fill your home with lush greenery. If you have just one single healthy Pothos plant, you basically have an infinite supply of houseplants waiting to happen.
Propagating plants in water is a foolproof way to clone your favorites without dealing with messy soil mixes right away. It also creates a beautiful, living piece of decor for your window while you wait for the roots to grow. Watching those tiny white roots burst out and stretch week by week is incredibly rewarding. This quick guide breaks down my personal routine for taking cuttings, setting up a thriving water station, and keeping the stems healthy until they are ready for a permanent pot.
The Anatomy of a Perfect Cutting
You cannot just hack off a piece of a plant vine, throw it in a cup of tap water, and expect it to grow. For a Pothos stem to produce roots, it must contain a very specific piece of plant tissue.
Look closely at any long vine on your mother plant. You will notice small, raised brown bumps on the stem right below the spot where the leaf stem connects. These tiny bumps are called nodes. Nodes contain the specialized cells responsible for generating entirely new root systems. If your cutting doesn’t have a node, it will sit in the water looking green for a few weeks before it turns to mush and rots.
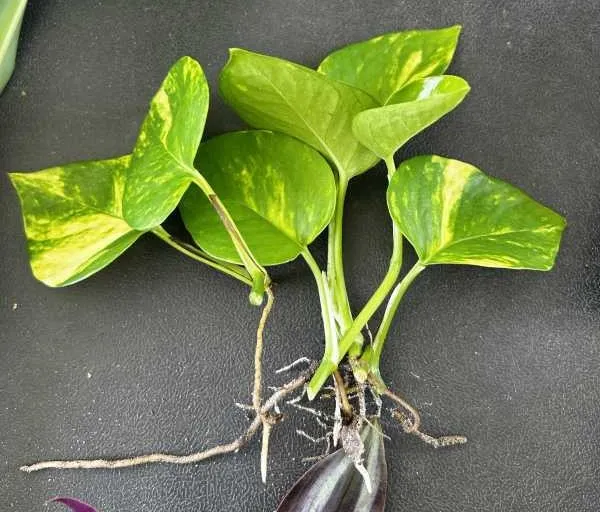
To prepare your cuttings, choose a healthy vine that has plenty of lush leaves. Don’t use vines that look pale or are stripped of their foliage. Take a clean pair of scissors or shears and make a clean cut about an inch below the node. I prefer to make the cut at a slight 45-degree angle. This simple technique maximizes the surface area for water absorption.
Always use sharp, sterilized tools to avoid shocking the plant. I recommend these Precision Pruning Shears for a clean, healthy cut every time. Dull household scissors can crush the delicate stem tissue, which invites bacteria and leads to early decay.
Setting Up Your Water Station
Once you have your cuttings ready, you need to strip away any leaves that sit too low on the stem. If a leaf is submerged under water, it will decompose rapidly, foul the water quality, and suffocate the emerging root system. Keep the top two or three leaves intact to continue drawing light, but make sure the bare node at the bottom remains completely under the water line.
Place your clean cutting into a small glass jar, vase, or test tube filled with clean, room-temperature water. To get that signature SolaPlant look, I love using these Desktop Glass Propagation Stations. They turn a simple cutting into a stunning piece of art for your home. Clear glass containers are highly practical because they allow you to monitor the water clarity and root development without pulling the stems out and disrupting them.
The Waiting Game and Algae Control
Now comes the part that tests your patience. Take your filled propagation jar and place it on a bright windowsill or shelf. The ideal spot receives hours of bright, indirect sunlight. Avoid placing the station in direct, harsh sun rays. Intense sunlight will quickly overheat the water and scorch the delicate leaves. It also triggers massive algae blooms inside the glass.
Change the water once a week to keep oxygen levels high. Fresh water prevents stagnation and keeps deadly root-rot bacteria away. If the water starts looking cloudy or green before the week is up, empty it immediately, rinse the glass out thoroughly, and refill it. Botanical research from institutions like the University of Florida IFAS Extension shows that consistent water changes maintain the dissolved oxygen levels required for root cellular respiration.
I always use my Plastic Spray Bottle to keep the leaves hydrated and clean during this process. Mist the upper leaves every few days to keep them free from household dust so they can perform photosynthesis efficiently. In about two to three weeks, you will see bright white root nubs forming right from those brown bumps.
When Is It Time for Soil?
Don’t leave your cuttings in water indefinitely if you eventually want them to live in dirt. Water roots are structurally different from soil roots. They are fragile, delicate, and adapted to pulling oxygen directly from a liquid environment. If you wait until the roots are a foot long before planting them in a solid mix, the plant will experience severe transplant shock and likely wither away.
The sweet spot for transplanting is when the main roots reach about two inches long and have started branching out into smaller secondary root hairs. This process typically takes about four to six weeks total. Once the root system hits this stage, your Pothos is officially ready for its permanent home.
Transitioning from water to soil requires a few specific steps to ensure those delicate water roots survive the move. You must keep the new potting soil consistently damp for the first week after planting to help the root structure adapt to its new, dense home without drying out. If you are ready to expand your collection or want to learn the exact potting method I use to ensure a high survival rate during the soil transition, check out this next guide. Step-by-Step: How to Pot Your Water-Propagated Pothos outlines the best soil mix and the perfect pots to ensure your new plant thrives.
SolaPlant Essentials for Propagation
Before you start snipping away at your vines, make sure you have a strong, mature mother plant to work with. Starting with high-quality stock ensures your cuttings have enough stored energy to root successfully.
- Live Pothos Plant: The perfect mother plant to start your collection.
- Glass Propagation Tubes/Vases: For that clean, aesthetic display.
Snip your vines right below the brown bump, change the water weekly, and you can easily fill every empty shelf in your home with free, beautiful houseplants.